Appearance
Template System
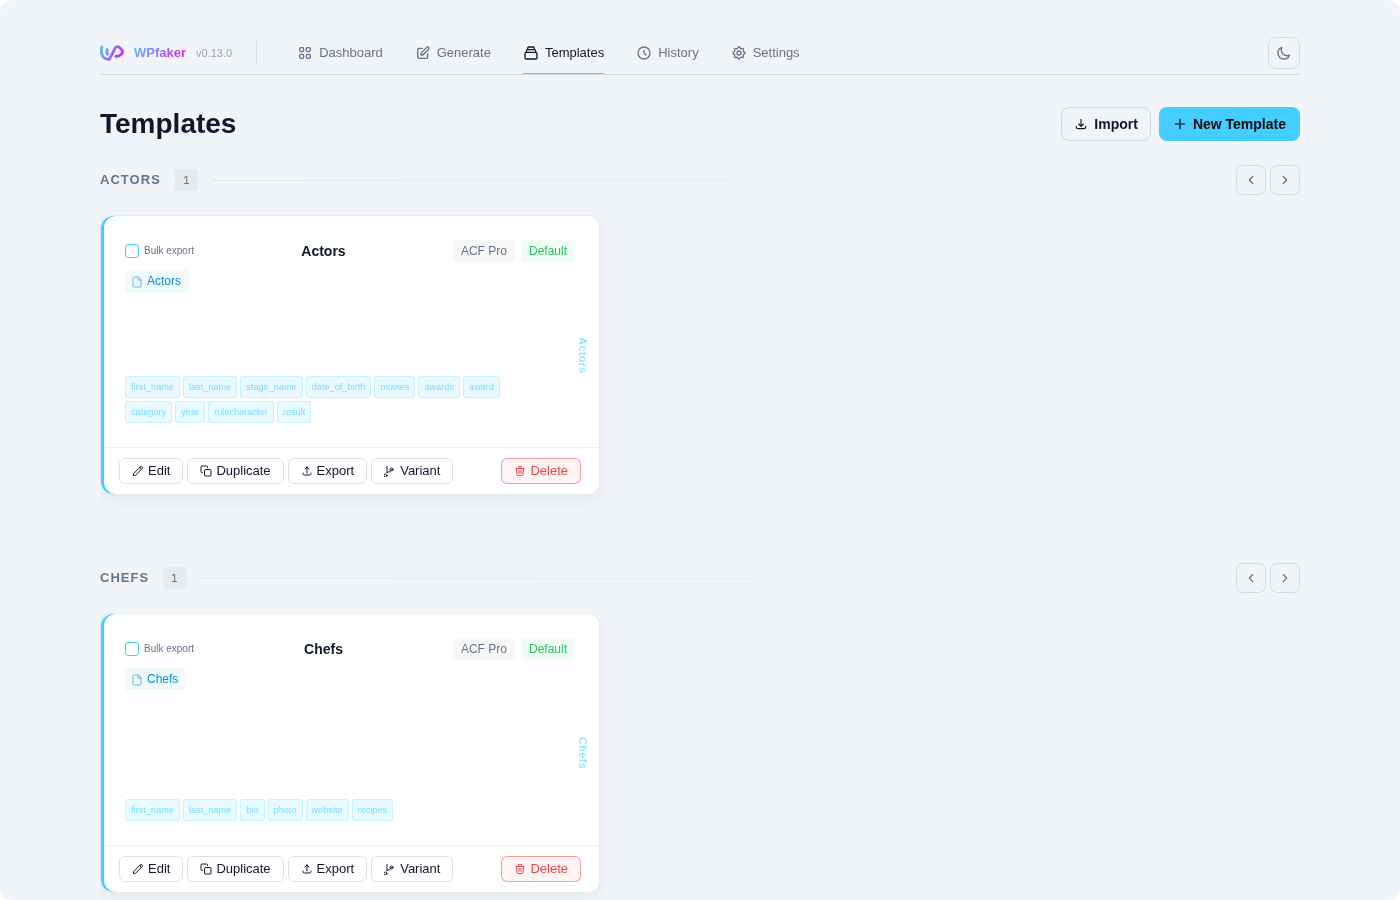
Templates are the most powerful feature in WPfaker. They let you save an entire generation configuration — post status, image provider, locale, variation profile, taxonomy rules, and per-field generation settings — into a reusable package that you can apply with a single click. Instead of manually reconfiguring dozens of options every time you need test data, you define a template once and reuse it across sessions and post types.
TIP
If you are new to WPfaker, start with the Quick Start guide and come back here once you have generated your first batch of posts. Templates build on every other feature in the plugin.
What a Template Stores
A template captures every setting that affects how posts are generated. This includes the target post type, the post status to assign, which image provider to use and at what dimensions, the locale for language-specific fake data, the variation profile that controls structural diversity, and — most importantly — the per-field and per-taxonomy configuration that tells WPfaker exactly how to populate each piece of data. When you apply a template on the Generate page, all of these settings are restored instantly, giving you a one-click path to consistent, repeatable content generation.
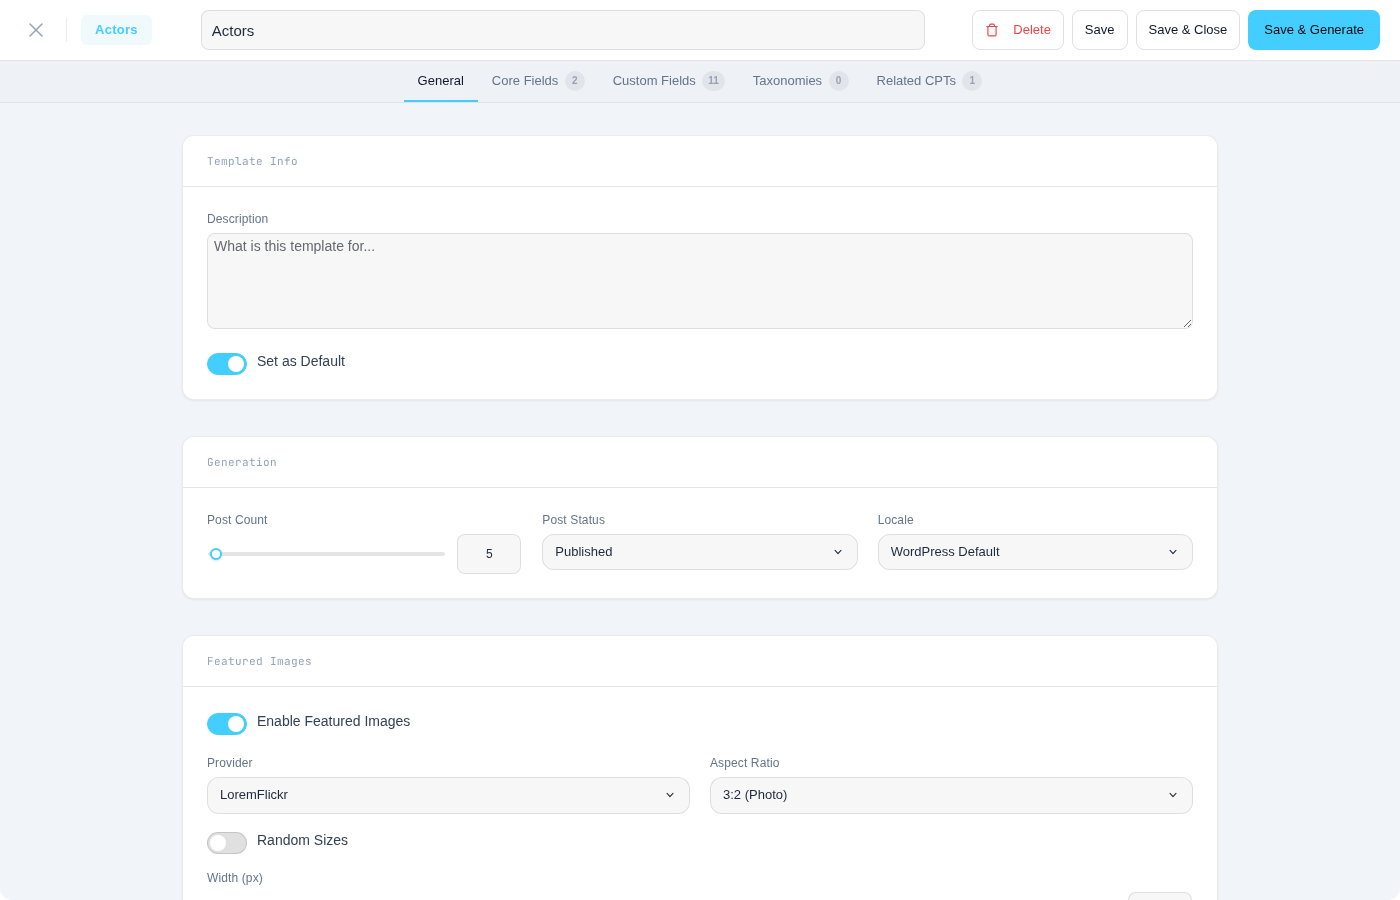
The Template Editor
The template editor uses a single-column layout with five tabs that organize all configuration into focused sections. Each tab handles one aspect of the template, letting you work through settings sequentially or jump directly to the section you need.

General Settings Tab
The first tab contains the template's identity and global generation options: template name, description, target post type, post status, image provider and category, faker locale, and variation profile. The target post type is locked after creation. When the post type supports comments, a collapsible Comments section lets you configure auto-generated comments (count range, threading, and reply probability).
Core Fields Tab
WordPress's built-in fields — title, content, excerpt, date, status, and author — are configured here. Each field opens as an expandable card with inline settings for its generation mode and parameters.
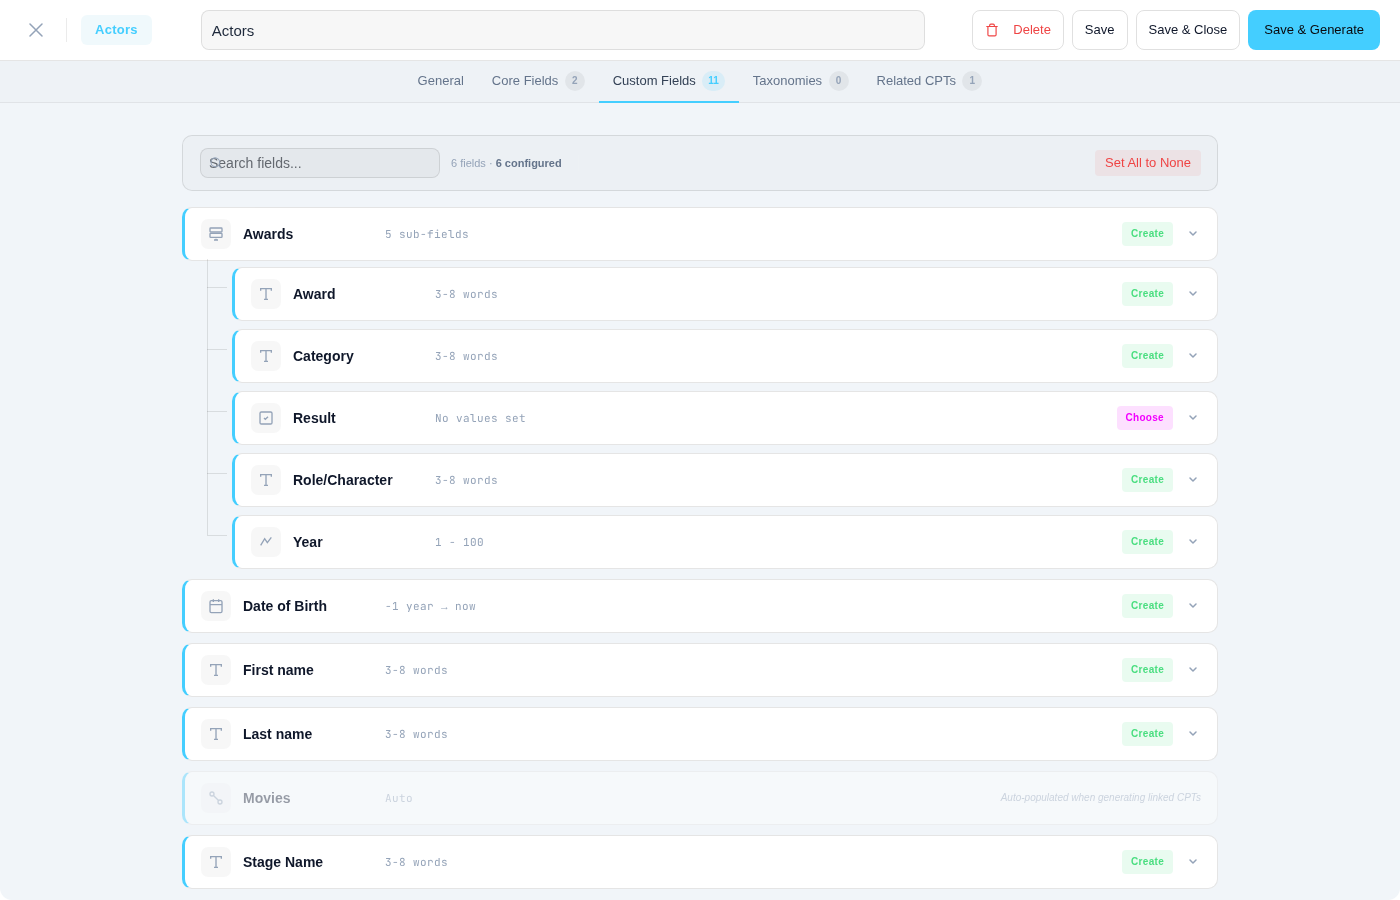
Custom Fields Tab
All fields detected from ACF, Meta Box AIO, JetEngine, or native post meta appear in this tab. See Custom Fields and JetEngine Fields for plugin-specific behavior. Each field is shown as an expandable card displaying the field key, type, and current mode. Click a card to reveal its full configuration.
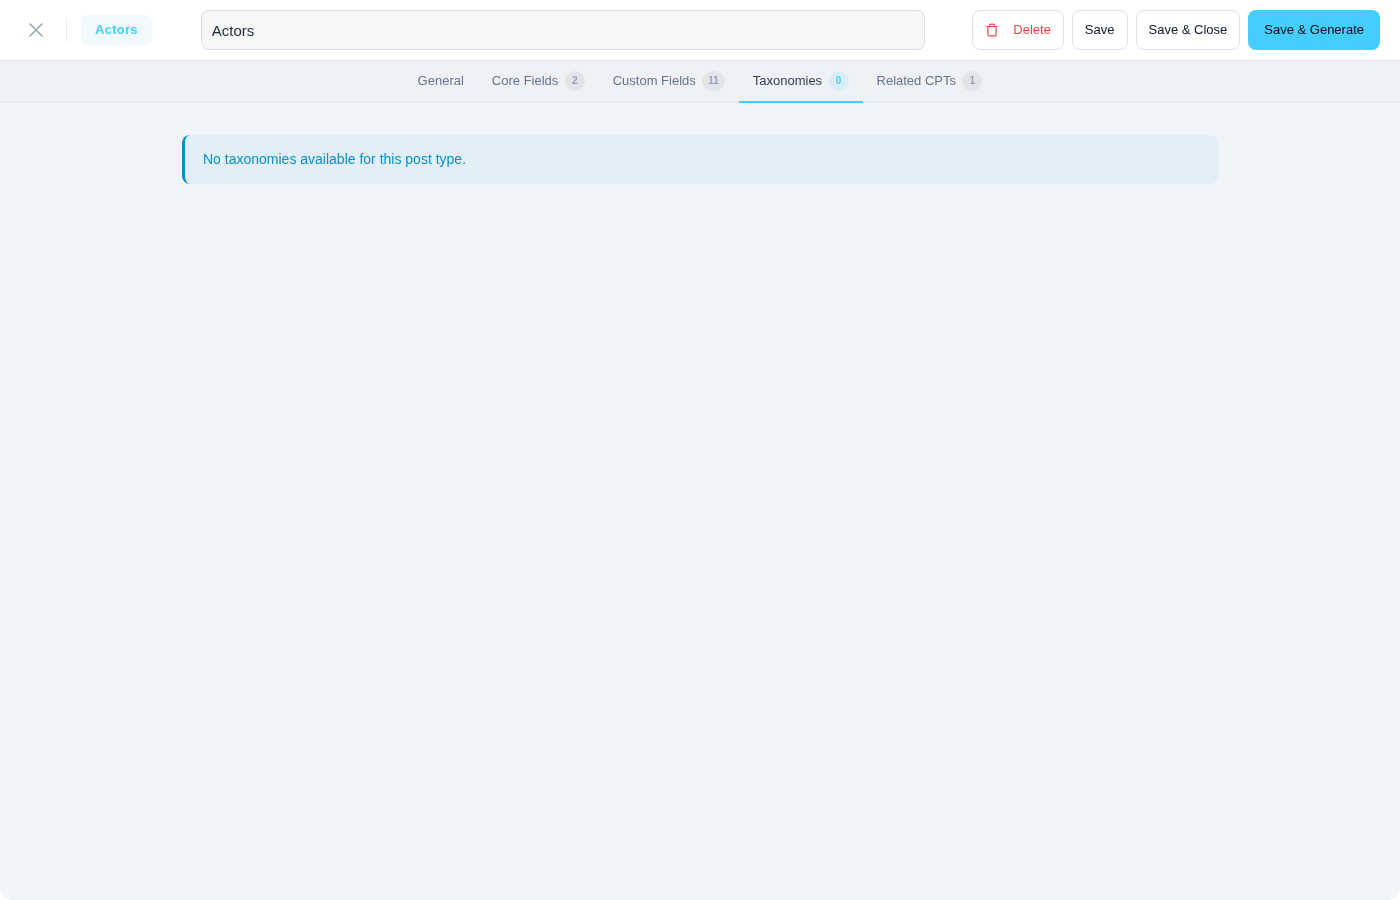
Taxonomies Tab
Every taxonomy registered for the post type is listed here — categories, tags, and custom taxonomies. Each taxonomy can be set to None, Choose, or Create mode with its own assignment rules.
Related Post Types Tab
When the post type has relational fields pointing to other CPTs, this tab shows each dependent CPT with per-CPT options for auto-creation. See Related Post Types for details.
Field Configuration Modes
Every field in a template can be set to one of four modes that determine how WPfaker handles it during generation.
Create Mode
Create mode tells WPfaker to generate data automatically using FakerPHP. This is the most common mode and the one that gives you the richest configuration options. When a field is set to Create, you choose a faker method appropriate for the field type and then fine-tune its parameters. For a text field, you might select "sentence" and configure a word count range of 4 to 12 words. For a textarea, you might choose "paragraphs" with a count between 3 and 6, optionally enabling HTML output that includes headings, lists, and blockquotes. For a WYSIWYG editor field, you get the full range of rich HTML markup options including headings at various levels, ordered and unordered lists, blockquotes, and inline images. The specific faker method and its parameters are determined by the field type — see the full breakdown in the "Faker Methods by Field Type" section below.
Choose Mode
Choose mode lets you select from predefined values rather than generating random data. This is particularly useful for select, radio, and checkbox fields where the available options are already known. When you set a field to Choose mode, WPfaker presents the field's available options and you pick which ones should be used during generation. For select and radio fields, one value is randomly selected from your chosen pool for each generated post. For checkbox fields, a random subset of your selected options is assigned. You can also use Choose mode on text fields by entering a list of specific values that WPfaker will randomly pick from.
None Mode
None mode tells WPfaker to skip the field entirely during generation. The field will remain empty in the generated post. This is useful when you want to test how your theme handles missing data, or when certain fields are irrelevant to your testing scenario. Note that required fields cannot be set to None mode — if you try, WPfaker will still populate them with default-generated data to ensure valid posts are created.
Custom Mode
Custom mode lets you enter a specific static value that will be applied to every generated post identically. Unlike Create mode, which produces different values for each post, Custom mode sets exactly the same value every time. This is useful for fields that should have a consistent value across all test posts, such as a "status" meta field that should always be "active" or a "source" field that should always say "WPfaker test data."
Faker Methods by Field Type
The generation method available in Create mode depends on the field's type. WPfaker maps each field type to a set of appropriate faker methods and exposes the relevant parameters for fine-tuning.
Text Fields
Text fields support methods like sentence (with configurable minimum and maximum word count), words (returns a specific number of words), name (generates a locale-aware person name), and company (generates a company name). The word count range lets you control how long or short the generated text will be, which is important for testing layouts that must accommodate varying title lengths.
Textarea Fields
Textarea fields offer the paragraphs method, where you configure the minimum and maximum paragraph count. You can optionally enable HTML output, which wraps the paragraphs in <p> tags and intersperses headings and lists throughout the content. Without HTML enabled, the output is plain text separated by newlines.
WYSIWYG Fields
WYSIWYG fields are similar to textareas but produce richer HTML markup by default. The generated content includes paragraph blocks interspersed with <h2> and <h3> headings, ordered and unordered lists, blockquotes, and optionally inline images. This creates content that closely resembles what a real author would produce in a WordPress visual editor.
Number Fields
Number fields use a random integer or float generator with configurable minimum, maximum, and step values. You can also specify decimal places for float values. This lets you generate realistic price ranges, quantities, ratings, or any other numeric data your custom fields require.
Date Fields
Date fields support smart date range parsing using human-readable strings. You specify a start and end boundary such as "-1 year" to "now", "last month" to "next year", or even specific dates. WPfaker generates random dates within that range, properly formatted for the field's expected date format.
Select and Radio Fields
These fields use the randomElement method, which picks one value from the list of available options. In Create mode, all available options are included in the pool. In Choose mode, you can restrict which options are eligible.
Checkbox Fields
Checkbox fields use randomElements (plural), which selects a random subset of available options. Each generated post may receive a different combination and number of checked values.
True/False Fields
True/false fields let you set a probability percentage. A value of 50 means each generated post has a 50% chance of the field being true and a 50% chance of it being false. Setting it to 80 means 80% of posts will have the field set to true. This is a simple but effective way to create realistic boolean distributions.
Color Fields
Color fields generate random hex colors (like #a3f29c) or RGB color values, depending on the selected method.
Email Fields
Email fields offer methods including safeEmail (uses example.com domains that will never accidentally send real email), freeEmail (uses common provider domains), and companyEmail (combines a generated company domain with a name).
URL Fields
URL fields can generate generic URLs, image URLs, or domain names, depending on which method you select.
Image Fields
Image fields use the configured image provider (Picsum, Placeholder, or others) and let you specify dimensions and categories. The generated image is downloaded and added to the WordPress media library, then attached to the field.
Repeater Fields
Repeater fields let you configure each sub-field individually, just as you would a top-level field. You also set a minimum and maximum row count, and WPfaker generates a random number of rows within that range, populating each sub-field according to its own configuration.
File Fields
File fields either generate a file or select an existing attachment from the WordPress media library, depending on configuration.
Core Fields
WordPress's built-in post fields are always available in the Core Fields tab, regardless of which plugins are installed.
The Title field defaults to Create mode using the sentence method with a configurable word count range (typically 3 to 10 words). The title is always required and cannot be set to None mode. The Content field defaults to Create mode using the paragraphs method with rich HTML output. The Excerpt field generates a shorter text passage. The Date field generates a publish date within a configurable range. The Status field lets you choose which post status (publish, draft, pending, private) the generated posts should receive. The Author field rotates through available users or, when combined with user generation, through a pool of freshly generated author accounts.
Taxonomy Configuration
The Taxonomies tab in the template editor lets you configure how taxonomy terms are assigned to generated posts. Each taxonomy registered for the post type appears here and can be set to one of three modes.
In None mode, no terms from that taxonomy are assigned to generated posts. In Choose mode, you search and select specific existing terms, then configure how many of them should be assigned per post using minimum and maximum term count settings. WPfaker randomly picks a number within that range and assigns that many terms from your selected pool. In Create mode, WPfaker generates new terms with random locale-aware names and auto-generated descriptions, then assigns them to the posts. For hierarchical taxonomies like categories, you can enable child term inclusion and control the depth of the generated hierarchy.
INFO
For more details on taxonomy generation as a standalone feature, see Taxonomy Generation.
Related Post Types
When a post type has relational fields — ACF Relationship, Post Object, JetEngine Relations, or Meta Box AIO Post fields — the Related Post Types tab lists every dependent CPT. This tab controls how WPfaker handles cross-CPT dependencies when generating posts from this template.
Each target CPT appears as a card with its own configuration options:
| Option | Default | Description |
|---|---|---|
| Enabled | On | Toggle auto-creation of related posts for this CPT |
| Count | 5 | Number of posts to ensure exist (1--50) |
| Post Status | Publish | Status for auto-created posts (publish, draft, or random) |
| Variation | Off | Apply Content Variation to auto-created posts |
| Featured Image | Off | Assign featured images to auto-created posts |
When auto-creation is enabled for a target CPT, WPfaker checks how many posts of that type already exist. If the count falls short, it creates the missing posts before generation begins. If a default template exists for the target CPT, the auto-created posts use that template's configuration.
Related posts are generated separately from the main posts through WPfaker's chunked generation system. The Dependency Resolver creates any missing target posts in their own chunks before the main generation begins.
INFO
Required relations — where a relational field is marked as required in the field plugin — cannot be disabled. The toggle is locked to prevent generating posts with empty required fields.
Linked Child Templates
Each target CPT in the Related Post Types tab can be linked to its own dedicated template. When a child template is linked, auto-created posts for that CPT use the linked template's full configuration — field modes, taxonomy rules, and generation settings — instead of falling back to the CPT's default template or WPfaker's automatic field configuration.
You have three options per target CPT:
Create New creates a fresh template for the target CPT and links it to the current template in one step. The new template opens in the editor so you can configure it immediately.
Link Existing lets you pick from templates that already exist for the target CPT. A dropdown shows each template's name and a configuration summary (number of configured fields, taxonomies, and generation options).
Unlink removes the link without deleting the child template. Auto-creation falls back to the CPT's default template or automatic field configuration.
When a template has linked parents, a banner at the top of its editor shows which parent templates reference it, with a link to navigate directly to the parent.
TIP
Linked child templates are especially useful for complex multi-CPT setups. Instead of relying on auto-detection for related post content, you define exactly how each dependent CPT should be populated — ensuring consistent, high-quality test data across your entire data model.
Decoupling CPTs from Relations
By default, WPfaker auto-creates related posts and populates relational fields for every cross-CPT dependency. This is useful for testing fully linked content, but sometimes you want to generate posts for a single CPT in isolation — even when it has relational fields. Templates give you two ways to decouple.
Disable auto-creation per CPT. Toggle a target CPT off in the Related Post Types section. WPfaker skips auto-creation for that CPT and populates relational fields only from posts that already exist. If no posts of that type exist, the relational fields remain empty.
Skip relational fields entirely. In the Custom Fields tab, set individual relational fields to None mode. WPfaker ignores those fields during generation — no auto-creation is triggered, and no values are written. This lets you create a "standalone" template that generates the CPT's own content without touching any cross-CPT relationships.
Combine both approaches for full control. A property template might disable auto-creation for agent (use existing agents only) while setting the related_offices field to None (skip entirely). The result is a focused template that generates property posts linked to existing agents, with no office relationships.
TIP
Decoupled templates are especially useful during early development when you want to build and test one CPT at a time. Create standalone templates first, then switch to fully linked templates once all CPTs are in place.
Default Templates
You can mark one template as the default for each post type. When the "Auto-Select Default Template" option is enabled in Settings, this template loads automatically whenever you open the Generate page for that post type. This saves an extra click and ensures your team always starts from a known configuration.
However, it is important to understand how template defaults interact with your manual changes. If you have previously made changes on the Generate page, those settings are saved to your browser's localStorage and take priority over the default template. The priority chain is: your Generate page settings (localStorage) first, then the applied template, then the plugin defaults. Your manual choices always win. If you want the default template to take effect, clear your Generate page settings first.
Duplicating Templates
You can clone any existing template by clicking the Duplicate action on its template card. The clone is created with a "(Copy)" suffix appended to the original name. This is particularly useful when you want to create a variation of an existing configuration — for example, duplicating a "Blog Posts - Full Content" template to create a "Blog Posts - Minimal Data" version where you reduce field completion and disable featured images.
Template Variants
Variants let you create lightweight variations of an existing template without duplicating the entire configuration. A variant inherits all settings from its parent template and stores only the values you change. This keeps your template list clean while giving you quick access to alternative generation profiles for the same post type.
Creating a Variant
Click the Variant+ button on any template card. WPfaker creates a new variant named "{Template Name} Variant" and opens it in the editor. The variant starts as an exact copy of the parent's configuration — every field mode, taxonomy rule, and generation setting is inherited. From here, you change only what needs to differ.
Common use cases for variants:
- A "Draft" variant that changes post status from publish to draft
- A locale variant that generates content in German instead of English
- A "Minimal" variant that reduces post count and disables images
- A "No Comments" variant that turns off comment generation
How Overrides Work
Variants use sparse storage. Instead of copying the parent's entire configuration, a variant records only the keys that differ. When WPfaker generates posts from a variant, it deep-merges the parent's full config with the variant's overrides at runtime. This means changes to the parent automatically propagate to all its variants — unless the variant explicitly overrides that setting.
For example, if you add a new custom field configuration to the parent template, every variant inherits it immediately. But if a variant has overridden the locale setting, that override persists regardless of what the parent's locale is set to.
Visual Organization
On the template list page, variants are grouped under their parent template. The parent card appears first, with its variants nested beneath it. This grouping makes it easy to see which variants belong to which root template and to navigate between them.
The variant editor shows a badge indicating it is a variant, along with the number of active overrides. This count tells you at a glance how much the variant diverges from its parent.
Limitations
Variants are one level deep. You cannot create a variant of a variant — only root templates show the Variant+ button. A variant also cannot be marked as the default template for a post type; only root templates can serve as defaults.
Deleting a root template cascades to all its variants. If you need to preserve a variant's configuration before deleting its parent, export it first.
TIP
Variants are ideal when you need the same field configuration with minor setting changes. If two templates differ significantly in their field modes or taxonomy rules, use separate root templates instead — variants work best for small, focused overrides like locale, post status, or count changes.
Export and Import
Templates can be exported as JSON files and imported on other WordPress installations. Click the export button on any template card to download a JSON file containing the complete template configuration — field modes, faker methods, parameter values, taxonomy rules, and all generation options. On the target site, click Import Template and select the JSON file. WPfaker creates a new local template from the imported configuration.
The JSON export includes all field configuration data, making templates fully portable between sites that have the same post type and field structure.
TIP
Export/Import is useful even for single-site workflows. You can export a template before making major changes, giving you a backup to restore from if needed.
Using Templates During Generation
To apply a template when generating posts, navigate to WPfaker > Generate Posts and select your template from the dropdown at the top of the page. All generation settings, field configurations, and taxonomy rules from the template are loaded immediately. You can still adjust the post count or tweak individual settings before clicking Generate — any changes you make on the Generate page override the template's values for that session.
When a template is active, a notice displays the template name along with a summary of the applied configuration, including the number of configured taxonomy rules. An Edit Template button next to the dropdown lets you jump directly into the template editor without navigating away from the Generate page.
Auto-Select Default Template
When you change the post type on the Generate page, WPfaker automatically loads the default template for that type (if one exists and the Auto-Select setting is enabled in Settings). For post types that have only one template, that template is auto-selected regardless of whether it is marked as default.
Save & Generate
The template editor offers three save actions in the header:
Save stores the template configuration and keeps the editor open.
Save & Close stores the configuration and returns you to the template list.
Save & Generate stores the configuration and navigates directly to the Generate Posts page with the template pre-applied. When the "Auto-Run Save & Generate" setting is enabled in Settings, clicking Save & Generate also triggers generation immediately — skipping the extra click on the Generate button. A confirmation modal appears when existing posts of the same type are detected, giving you the option to delete them first.

Child Template Generation Behavior
When you click Save & Generate on a child or linked template, WPfaker checks the Child Generate Behavior setting to determine what to generate:
- Ask (default) — A modal asks whether to generate just this template or the full parent chain. Two buttons: "Generate [template name] only" and "Generate full chain from [parent name]."
- Child Only — Immediately generates only the current child template, skipping the parent.
- Parent Chain — Immediately generates the full chain starting from the root parent template, including all linked children.
For non-child templates, Save & Generate always navigates directly to the Generate page — the child behavior setting has no effect.
TIP
Save & Generate is the fastest path from editing a template to seeing the results. Enable auto-run in Settings to reduce the workflow to a single click. For child templates, set the Child Generate Behavior to "Parent Chain" to generate the entire linked data set in one action.
Best Practices
When naming your templates, use descriptive names that communicate purpose at a glance. Names like "Blog Posts - Full Content with Images" or "Products - Minimal Data" tell you exactly what to expect. Avoid generic names like "Template 1" or "Test" that become meaningless once you have more than a handful of templates.
Organize your templates around testing scenarios rather than just post types. For any given post type, you might have a "complete" template that fills every field (useful for layout testing and screenshots), a "minimal" template that only populates required fields (useful for edge case discovery), and a "realistic" template that uses the Random variation profile to create natural diversity. Keeping one fully complete template as a reference point is especially valuable for verifying that all fields display correctly in your theme.
Always configure required fields properly and test that the generated content validates against your post type's requirements. If a custom field plugin marks certain fields as required, WPfaker detects this automatically and prevents you from setting those fields to None mode.
Troubleshooting
If a template does not seem to be applying, first verify that it is selected in the dropdown on the Generate page and that the post type matches. Remember that your localStorage settings from previous sessions take priority over template values, so clearing saved settings may be necessary. If fields are not being generated despite being configured in the template, check that the field's mode is not set to None, that the corresponding field plugin (ACF, Meta Box AIO, JetEngine) is active, and that the custom fields toggle in the template sidebar is enabled. If you encounter duplicate templates being created when saving, ensure you are running WPfaker version 0.0.4 or later, which fixed this behavior.